Language development is such and important, but fun skill to observe in the development of a toddler. Watching what they pick up on receptively by following directions or descriptions is fun, especially when you realize 'they get it.' Watching them learn to express what they want is fun, but can also be frustrating as they try to learn the sounds to make close apporximations of the word they are trying to say. Our 18 month old is trying to say so many things- the problem is that many of his "words" sound a lot alike. 'Outside' and 'sock' are a variation of 'os' in his language capacity. Luckily, I can usually pick up on what he is trying to say. He also likes to make sounds to get us to understand what he sees, or is looking at- 'brroomm, brroommm' is a car, of course an 'arf, arf' is a dog, etc. It's funny to observe how different kids decide to communicate!
Working in the field I do, I have learned a small amount of simple signs that are used often with many of our students. This has made me very aware of the benefits of sign in communication. I have always wanted to learn more sign, but classes don't seem to be available at the right times or the resources I have looked into turn out not to be quite what I had hoped. Early on my husband and I began using simple signs like 'more' and 'all done' during meal times- these are signs that are used almost daily in the classroom, so a couple of the handful of signs I already knew. Since food is such an important part of daily life, that was a great time to begin experimenting with signing. I moved on to using signs for items or requests that he needed to use/say frequently and therefore had alot of meaning to him and would be easier to learn. 'Ball' and 'help' were two of them. Now, he doesn't use the exact form, but it does make it much easier for him to share his request/comment.
He seems to becoming more frustrated lately, because he has so much he is trying to say, and we can't quite understand everything he is saying. I recently purchased a baby sign book. It was difficult to choose which one would be most beneficial to our needs, as I again wanted to make sure I got a book that had signs of toys, objects, people, requests, etc. that are most used within our family. I finally picked one. Yesterday I went through the book and tore out the signs of words that are used frequently or that would be important words for our son to begin learning. I divided them into piles based on the area of the house we might use that word and then taped them up on a door or shelf for quick reference for us all. Here is hoping to less frustration on our son's part and increased ability to communicate what he wants/needs/sees/etc.!!!!
Monday, March 19, 2012
Sunday, March 18, 2012
Pizza (gluten free crust recipe)
Homemade pizza is a pretty regular meal in our house. It is yummy, easy, healthier than take out or frozen, and provides us with lots of leftovers. I opted for a gluten-free crust tonight. What I particularly like about the gluten free crust is that it is much easier for my son to chew than a traditional crust. We make 2 pizzas when we make pizza at home, one that we can make dairy-free for my son and the other, larger one so we will have plenty for leftovers.
Gluten Free Pizza Crust Recipe
Ingredients:
3 egg whites, or 9 Tbs liquid egg whites
1 Tbs olive oil
1/2 c. almond milk (I used store bought)
1/4 c.+ 1/8 c. brown rice flour
1/4 c. sorghum flour
2 tsp baking powder
1/4 tsp baking soda
1 3/4 tsp xanthan gum
1/8 tsp garlic powder
Step 1: Preheat oven to 350 degrees. Beat egg whites until frothy in a medium sized bowl.
Step 2: Add olive oil, baking soda, baking powder and blend. Add almond milk and blend.
Step 3: Add flours and xanthan gum and stir until dough thickens. If you would like a little flavor to your dough, add the garlic powder and mix well. The dough will be similar to a runny cookie dough consistency.

Step 4: Spray a 10" pizza pan with cooking spray and sprinkle a light amount of corn meal over pan. Drop dough in the center of the pan. Wet fingers and spread into pan (approx. 1/4" thick). You may need to wet fingers a few times while spreading to keep the dough from tearing. NOTE: the dough does thicken during baking.


NOTE: I used the measurements in the ingredients for our smaller pizza. I used 1 1/2 the recipe measurements to make our larger pizza.
While the dough is cooking...
To make the sauce you will need
1 can tomato sauce
1, 6 oz can tomato paste
1/2 tsp garlic powder
1/2 tsp onion powder
2 tsp Italian herbs
Combine all ingredients into a bowl and mix until all seasonings are dispersed throughout the sauce.
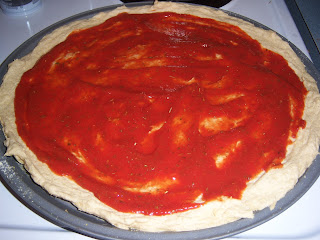
When the dough is done, add the sauce, and then add your favorite toppings. This time we used mozzarella cheese, turkey pepperoni, chicken, and red peppers. We put dairy free, soy free cheese on my son's pizza. We also chop the toppings up before placing them on his pizza, as he still doesn't have a lot of teeth to chew large chunks of food.


When your toppings are added...
Bake at 400 degrees for about 8-10 minutes until the cheese is melted. Turn the oven to Broil and broil for about 5-7 minutes until the cheese starts to brown and is bubbly.


Gluten Free Pizza Crust Recipe
Ingredients:
3 egg whites, or 9 Tbs liquid egg whites
1 Tbs olive oil
1/2 c. almond milk (I used store bought)
1/4 c.+ 1/8 c. brown rice flour
1/4 c. sorghum flour
2 tsp baking powder
1/4 tsp baking soda
1 3/4 tsp xanthan gum
1/8 tsp garlic powder
Step 1: Preheat oven to 350 degrees. Beat egg whites until frothy in a medium sized bowl.
Step 2: Add olive oil, baking soda, baking powder and blend. Add almond milk and blend.
Step 3: Add flours and xanthan gum and stir until dough thickens. If you would like a little flavor to your dough, add the garlic powder and mix well. The dough will be similar to a runny cookie dough consistency.

Step 4: Spray a 10" pizza pan with cooking spray and sprinkle a light amount of corn meal over pan. Drop dough in the center of the pan. Wet fingers and spread into pan (approx. 1/4" thick). You may need to wet fingers a few times while spreading to keep the dough from tearing. NOTE: the dough does thicken during baking.


Step 5: Partially bake 10-15 minutes until dough is lightly browned.
While the dough is cooking...
To make the sauce you will need
1 can tomato sauce
1, 6 oz can tomato paste
1/2 tsp garlic powder
1/2 tsp onion powder
2 tsp Italian herbs
Combine all ingredients into a bowl and mix until all seasonings are dispersed throughout the sauce.

When the dough is done, add the sauce, and then add your favorite toppings. This time we used mozzarella cheese, turkey pepperoni, chicken, and red peppers. We put dairy free, soy free cheese on my son's pizza. We also chop the toppings up before placing them on his pizza, as he still doesn't have a lot of teeth to chew large chunks of food.


When your toppings are added...
Bake at 400 degrees for about 8-10 minutes until the cheese is melted. Turn the oven to Broil and broil for about 5-7 minutes until the cheese starts to brown and is bubbly.


Serve and ENJOY!!
Monday, March 12, 2012
Cashew Milk Yogurt 2
I modified my cashew milk yogurt recipe slightly to see if I could get this yogurt to turn out a little better. I preferred this method over my initial attempt, as it is a little creamier consistency and did not have the curdled look like the other recipe after fermentation. I got to thinking that the other recipe probably had too much water to the mixture. This yogurt is creamy and has good flavor. I still prefer the coconut milk yogurt- I like the flavor better and has a creaminess about it that I really like. However if you don't like coconut, this would be good for you! The recipe I used for my yogurt...
Ingredients
5 cups homemade cashew milk
1 Tbs Honey
1/2 scoop of my son's protein powder (I used Kids' Life Basics Pea and Rice Plant Protein powder
1 Tbs Geletin
Step 1: Make sure all cooking utensils have been sterilized.
Step 2: Mix all ingredients except Gelatin into a pot. Bring to simmer. I let it get to about 175 degrees.
Step 3: Reduce heat. Whisk in 1 Tbs gelatin dissolved into 1/4 cup boiling water.
Step 4: Pour mixture into another bowl and place that bowl into a larger bowl of water. Allow mixture to cool to 95 degrees.
Step 5: 1/4 tsp probiotics. I bought Vegetal yogurt starter. I found the packets I ordered don't have quite 1/4 tsp of powder in them, so I added a little of my son's infant probiotic powder that has the same cultures to complete the full 1/4 tsp. Whisk WELL.
Step 6: Pour into fermentation containers and leave to ferment for about 10 hours with lids off. I've read varying options for the fermentation process; however being a beginner yogurt maker, I purchased a yogurt maker so I didn't have to monitor the temperature. Note: I'm not sure the mixture is supposed to be disturbed, but I stirred it a few times during the fermentation process as it seemed like it was curdling (maybe that's what it is supposed to do) Still learning.
Step 7: After allowing to ferment, place lid on containers and put in refrigerator for 8 hours. The contents will settle and a liquid might form at the bottom of the jars. As long as the smell is like yogurt and there are no off colors on your yogurt (pink, black, or gray), then it was a success. I had very little liquid with this recipe.
We enjoyed a nice smoothie with the yogurt for our evening snack. My son will bring some to daycare for his snack tomorrow!! YUM! ENJOY!

Sunday, March 11, 2012
Blueberry Lemon Bread
I'm on the lemon kick right now. It adds such nice flavor to the breads. So my next try is Blueberry Lemon Bread. I changed the recipe from the others slightly to see if it would rise a little better.
Ingredients:
3 Tbs non-dairy butter softened
3/4 c. sugar
1/2 c. applesauce (I used my homemade applesauce)
1 tsp vanilla
2 lemons- mashed and discard the membrane and seeds- keep the juice and pulp
1 1/4 c. wheat flour
1 c. white flour
1 tsp baking powder
1/2 tsp baking soda
1 c frozen or fresh blueberries (I used frozen wild blueberries as they are a little smaller berry)
Step 1: Grease 8 X 5 in loaf pan. Preheat oven to 350 degrees
Step 2: Combine butter, sugar, applesauce, vanilla, and lemons. Mix well.
Step 3: Add baking powder and baking soda. Blend well.
Step 4: Add Flours. Mix well
Step 5: Fold in blueberries. Pour mixture into loaf pan and place in oven. Bake for 50-60 minutes.

Allow to cool, then serve and ENJOY!! Always the best fresh out of the oven!!

Saturday, March 10, 2012
Goat Cheese and Cheddar stuffed burgers
On occasion we like to have stuffed burgers. We have tried many different kinds, but here is the most recent burgers we made.
3 to 4 oz goat cheese
12 thin slices of sharp chedder cheese off of a block
1 pound of hamburger
1 1/2 tsp Onion Powder
1 1/2 tsp Garlic Powder
1 1/2 tsp Johnny's Seasoning salt
Preparation time 15 minutes
Cook Time: Until burger is done and cheese is oozing out.
Directions:
Step 1:
Sprinkle Onion Powder, Garlic Powder, and Johnny's Seasoning Salt into 1 pound of thawed out hamburger. Mix.
Step 2:
Make six hamburger patties. Patties will need to be roughly the same size .
Step 3:
Make a small indent in the center of three patties. Insert the about 1 oz of goat cheese and 4 slices of cheddar cheese into each burgers indent. Place the other patties on top of the patties with cheese. Pinch around the edges to seal the patties.

Step 4:
Cook over medium heat until hamburger is completely cooked. Cheese should start oozing out the sides also.
Helpful Hint:
I find it much easier to flip the burgers and keep the burger together by using 2 spatulas.
Garnish with your favorite toppings. We like Avocado, spinach, pickles, ketchup, mustard, or BBQ sauce. Serve on a thin bun if you are wanting to reduce your carbohydrate intake. ENJOY!!

Sunday, March 4, 2012
Chicken and Rice Curry
This is such a quick meal, and depending on your needs and ingredients available, can be as quick as you desire. I prefer to use chicken I cook myself, but for those nights when you need something in a hurry, using canned chicken works well. This is also great if you have leftover chicken to get used up. We used rice this time, but I also love this with Quinoa!
Ingredients
2 small cans chicken meat, or 2 chicken breasts chopped
1 can black beans
4-6 green onions chopped (depending on how large they are)
1 small pepper chopped (red, yellow, or orange)
1 bag boil in a bag brown rice
bottle of curry (there are many ways to do this- you can mix a curry paste with coconut milk, make some from scratch, or we use Trader Joe's brand- very yummy)
Step 1: Boil rice according to directions on box. While that is cooking, cook chicken or warm the canned chicken in another pan.
Step 2: Add the black beans to the pan. While that is heating, warm your pepper and onion is a small pan.
Step 3: Combine the pepper and onion with the chicken and beans. Mix together. Add the curry and allow to heat through.

Step 4: Dish rice and top with the curry mixture. Serve and ENJOY!!!

Strawberry Lemon Bread
I really liked the raspberry lemon bread I made a couple weeks ago. I took out some strawberries we froze from last summer to have with breakfast the other morning, and decided to use some of them to make in a bread. And Strawberry Lemon bread was born- sounded so yummy.
Ingredients:
5 Tbs non-dairy butter softened
3/4 c. sugar
1/2 c. applesauce (I used my homemade applesauce)
1 tsp vanilla
2 lemons- mashed and discard the membrane and seeds- keep the juice and pulp
2 1/4 c. wheat flour
1 tsp baking powder
1/2 tsp baking soda
1 c frozen or fresh strawberries (mine were farm fresh berries frozen last summer and thawed then mashed before placing in the bread mixture)
Step 1: Grease 8 X 5 in loaf pan. Preheat oven to 350 degrees
Step 2: Combine butter, sugar, applesauce, vanilla, and lemons. Mix well.
Step 3: Add baking powder and baking soda. Blend well.
Step 4: Add Flour. Mix well
Step 5: Fold in strawberries. Pour mixture into loaf pan and place in oven. Bake for 50-60 minutes.

Saturday, March 3, 2012
Chicken Tenders
 While this meal isn't anything unusual, I thought I would post it, since it is a quick, easy meal.
 Ingredients:
Chicken tenders
Corn Flake Crumbs or Panko Crumbs
Pepper
Eggs
Milk
Step 1: Preheat oven to 350 degrees. Combine eggs and milk into a bowl. Amount will depend on how much you decide to make. We used 3 eggs and approximately 1/3 c. milk for an entire 3 lb bag of frozen chicken tenders.
Step 2: Mix crumbs and pepper on a plate.
Step 3: Dip chicken into egg mixture, then in crumb mixture, and place on greased baking sheet. Place in oven and bake for 20-30 minutes or until chicken is no longer pink.
Step 4: Serve and ENJOY! Dip in ranch, BBQ, or drizzle with hot wing sauce.

Great Toys for the Active Toddler
As an occupational therapist I am always on the look out for fun toys that help entertain, support development of skills, and encourage problem solving. One of the best investments we have made was to get a blow-up, bouncy ballpit. He loves to jump in, roll around in the balls, throw balls, and climb out. Of course it took him a little time to figure out how to get out without falling out- but it was fun to watch him learn!
Of course a cheap go to is always a ball. Rolling, throwing, bouncing, dribbling, catching- all important skills for little ones to develop, but also a great way to play as a family.
A basketball hoop is a fun way to encourage use of balls in ways other than throwing. He has to bring the ball up, figure out how to release the ball into the hoop, and as he gets older will learn how to toss the ball up to shoot a basket. Right now he loves to "slam dunk!"
Another favorite toy is a simple tunnel. Crawling through a tunnel allows continued development of recipricol movements, develops the arches of the hand through weight bearing, and is a fun way to play chase (lots and lots of giggles).
We don't buy many of the electronic toys. The wooden toys are great, or plastic toys with switches that require him to figure out how to use his hands to make the switches work to pop up the animals.
I love the bathtub crayons. It is a fun way to encourage development of pre-writing skills, work on fine motor strength, and again a fun activity to interact with your little one. Books are always great. This is nothing surprising. It is a fun way to help little ones learn and a great time to work on development of language skills by asking questions, pointing out colors, animals, objects, etc., or simply spending a moment together to read the story.
Puzzles are great to work on matching, problem solving, visual perceputal skill development, and fine motor development through manipulation of the pieces to get the pieces to fit.
Our son loves cars and trucks. Can't get enough of them. The small cars can encourage fine motor development and coordination, and play skills important for interaction with peers as he gets older.
Blocks and legos are simple toys that encourage motor skill development and control, grasp, hand strength, and again problem solving skills. Stacking blocks is an important developmental skill and once stacking has been mastered should be encouraged to explore building more complex designs.
Toys that can be pushed and pulled allow little ones the opportunity to work on problem solving by figuring out how to move the toy, and also encourages gross motor development and coordination helping them learn to walk forward and backward.
An item that I had never heard of before was a balance bike. What a great concept. This is simply a 2-wheeled bike, but without the pedals. It allows little ones to work on balance by using their feet to propel the bike, and allowing them to pick up their feet as comfortable to test their balance. At 18 months, the bike is still big for our son to use on his own, but he already loves to sit on the bike, hold onto the handle bars, and hold his feet up to go for a ride around the house. He is able to balance himself on the seat independently, with us holding the handle bars only as we navigate the bike around the house. The idea is that there is an easy transition to a traditional pedaled bike, without the need for training wheels. We will see how that goes as he gets older!
Parents need to get creative, allow their kids to get messy, encourage exploration of skills and various household tools, and think outside the box when looking for toys for their little ones. It doesn't have to cost a lot. In fact we don't buy a lot of toys. Our son much prefers to climb on things, play with items in the kitchen, walk around outside, flip through books, and LOVES balls. Often times, the simpler the 'toy' the better.
Subscribe to:
Posts (Atom)